How to have a gaming rig in your closet with VirtualHere and Powerline
Preface
I am an avid gamer and spend many nights playing (currently almost exclusively Call of Duty Warzone. As such, having a powerful rig is of great importance for usability and game play. I also stream via OBS most of my games (shameless plug, Twitch located here), so I need a rig that is relatively performance driven.
If you are looking for the VirtualHere magic TL;DR, please scroll to "Keyboard and Mouse".
NOTE: This will only work if you *bypass password on login*! This is not standard security practice and is advised ONLY to proceed in environments where login security is not critical. For a machine whose near sole purpose is gaming, this was not a factor.
The Problem
Previously I had been gaming nightly in my office. This worked out relatively well since the hub of my technology and network stack is right there, requiring a simple plugin. However, the disconnect between the bedroom and office was large and felt disconnected. As such, we redesigned our bedroom and now have a bed in the middle with two identical desks on either side with just enough room to fit it all. The previous drawer cabinets we had (chintzy metal from IKEA) left a gap in the back where I would place my computer. This worked out alright until a week or so passed. Living in Arizona, it's hot. Really hot. And the home is the only reprieve we have to get away from the blister and sweltering heat.
Now imagine a computer rig with still good airflow that is running a RTX 2070 and a Ryzen 2700. It's nice, but still generated a lot of heat and was directed venting out towards the bed. So I did what any logical person would do and threw more money at it - in the way of case fans. Throw more fans hoping to cool it down. As you can imagine, very small band-aid which was not effective enough. It made it really pretty - Thermaltake RGB case fans are nice if RGB lighting is what you're going for.
Alright, onto the next logical step - pseudo cooling. This time a closed loop water cooler radiator on the CPU and a heat sink water cooler on the GPU. The GPU required a bit more work as you have to strip the stock heatsink away in order to mount it.
This solution yielded great results in reducing temperatures at the core level but still...I cannot change the laws of thermodynamics. This brings me to...
David's Super Secret Gaming Rig in a Closet
It came to me after thinking - where's the last place I can put this that it is not completely remote but I still can use it when I need to. I looked around our bedroom and the closet remained the last viable option. Not only is it away from the bed, it is inside a walk in closet with a physical door that can be closed. Perfect! I made some space, vacuumed some dust bunnies out and placed my computer in there. So now we have a few problems...
- Power
- Hardwired networking
- Display
- Audio
- Keyboard and Mouse
Power
Power is derived from a Cyberpower 1500VA true sine-wave UPS. Trailing from that is a braided grounded 3 outlet 9 foot cord that goes down from the UPS, hugs the wall, and into the closet. I currently only have that computer plugged in there, but you could plug two more accessory/monitoring devices else wise.
Hardwired Networking
This one posed an interesting one since my office, where my Unifi gear is, and the computer are in different rooms clearly. My home is neither wired from network drops (not even coax or a phone jack if we're being honest...) so most of you may see where this is going. After long troubleshooting and many outlets, I was able to find a place to plug in my TP-LINK AV2000 Gigabit powerline adapters. Anyone familiar with powerline adapters will probably balk at the idea, but when running cable is not feasible at this time, this is the best solution. And to be frank, it has worked out wonderfully. I've had little issues and only around 10-12% drop from source network. From the powerline module, I run a CAT6 cable into the closet on the same path that the power cord runs. They are all tied up and meet together inside the closet.
Display
This was an interesting one - the monitor I have only seems to want to work with DisplayPort (and maybe for good reason). I went through may different cables of different sizes on Amazon and eventually came to CableMaters 25Ft DisplayPort cable. The latching mechanism became prudent since the area is trafficked and could be jostled from time to time. According to some sources, 15m (49Ft for US folks) is around the max length, so we are well below that.
I also now own a pack of 5x25Ft Amazon branded DisplayPort cables too since they were only $20 some how, but without latching mechanism so they'll sit in a box until some other case comes up.
Audio
This one was quite easy since I set nearly 10 feet away from the computer. I reused my SteelSeries Arctic 7 headphones and just propped the USB receiver up closest to the door. Problem solved and no sound issues!
Keyboard and Mouse
This proved to be the most arduous of issues to solve, but not without the help of some clever workarounds and software. I had previously and quite enjoy using VirtualHere on an older Intel Compute Stick in order to fix print driver issues that surprisingly only one machine had.
My current desk computer is a Intel Skull Canyon running Ubuntu 20.04. This is great since it allows me to use Docker in a native environment as well as pass USB devices to it without the wierdness that Windows could interject.
** Updated 12/17/2020 **
I have since moved on to using my laptop as my full time machine, so the Skull Canyon has be removed from this equation. I am currently using a NanoPi NEO Plus2 (by FriendlyElec). This is an ARM based board which has 2 USB ports as well as Gigabit Ethernet. This is great and provides enough power to both run four VirtualHere instances, but not bottleneck on networking like an Asus VivoStick runnug Ubuntu 20.04 (on wifi or USB Ethernet) would. I highly suggest this route as it is small and keeps your setup contained.
VirtualHere can be ran in Docker and I prefer this image since it does auto updating. Please feel free to bring down the source and rebuild for the base image of your choice.
$ docker run -d -v /host/directory:/data -p 7575:7575 --privileged --name moritzf-virtualhere moritzf/virtualhere:latest
Are you seeing where we are getting at?
VirtualHere has a licensing model that ties licenses to a server instance. Unfortunately they cannot be migrated easily and are pretty locked in. Do not get me wrong, VirtualHere is amazing and feature filled.
So where do we go from there? We create one VirtualHere server per device we want to use! I have a keyboard and mouse that I'm using, so I create two instance with incremental differing ports (7575 and 7676). Ensure you provide two directories since they store their config files in there.
Now, the above can all be done through a Raspberry Pi or other SBC/thin client; really any device you can. But make sure it has enough I/O power and hard wired Ethernet. You want to eliminate all variables for latency wherever possible.
After you have these running, you will have keyboard access at your "desktop" computer as well as access from any other device that can run VirtualHere.
In my case, we are using Windows since I am gaming. This will require temporary keyboard and mouse access in order to setup the script, paths, and other required variables on your closet gaming rig.
You will need:
- The IP address of the VirtualHere server
- The ports of the containers you are running for VirtualHere
- AutoIt3 installed (preferably with Script Editor)
- VirtualHere Windows Client
- Unified Remote (for Android; not required but very helpful)
Download and install VirtualHere client but do not install in service mode. Just the binary is necessary. Open VirtualHere and you'll see "USB Hubs". Right click and select "Specify Hubs". Click add and add using the IP address and port for each VH instance you have. Afterwards, it should show up with two servers of which you can see duplicate devices.
Mentally assign each device to a server - you can make this easier by right click on the instance name, properties, and renaming it to Device VH so you can remember which; this will come in handy later.
VirtualHere is a great piece of software that is actually very feature rich. One of the standout ways to me is how versatile it is. There's a little know feature that is the Client API which we will be using to discover IDs and connect to devices.
Open a command line prompt and navigate to the VH binary. We can run vhui64.exe -t help to get a list of commands. In particular we are looking at:
- LIST
- USE,<address>[,password]
- STOP USING,<address>
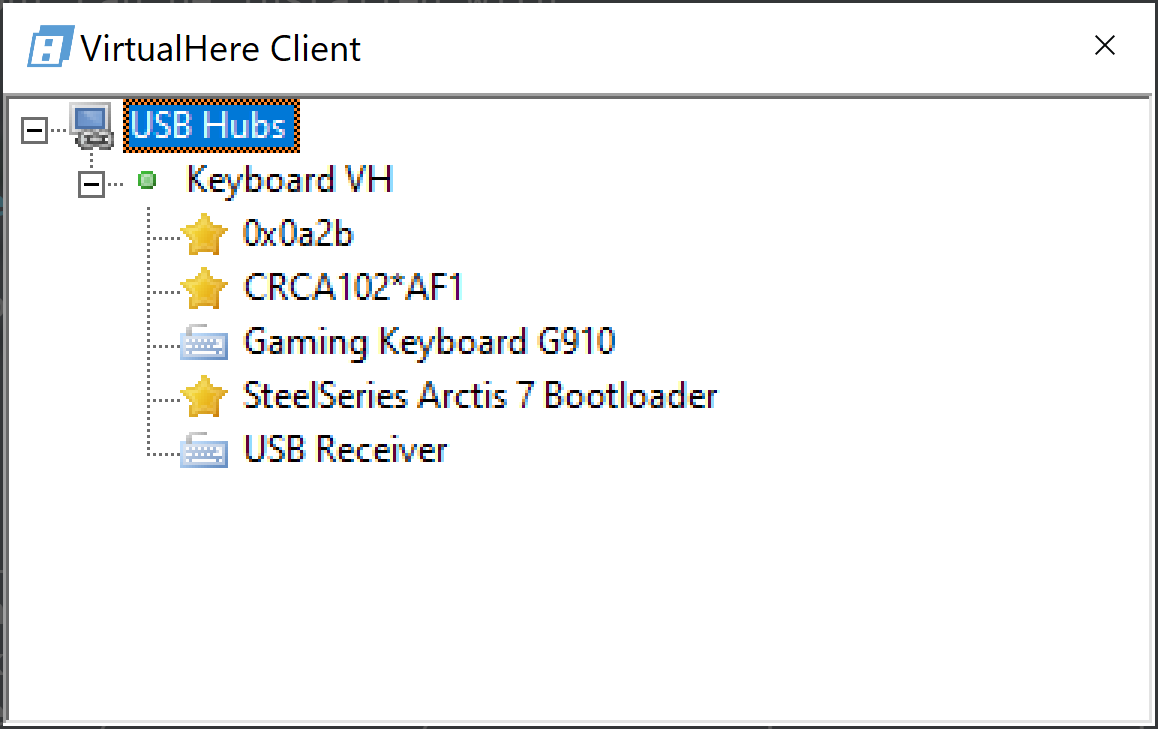
With these 3, we can now get the IDs in order to automatically connect to the devices. Commands are issued as such vhui64.exe -t "LIST" in order to receive a list of devices that will look something like this:
 C:\Users\David\Downloads>VirtualHere Client IPC, below are the available devices:
 (Value in brackets = address, * = Auto-Use)

 Keyboard VH (5e55fefe2c80:7575)
    --> SteelSeries Arctis 7 Bootloader (5e55fefe2c80.1324)
    --> USB Receiver (5e55fefe2c80.12)
    --> CRCA102*AF1 (5e55fefe2c80.1323)
    --> Gaming Keyboard G910 (5e55fefe2c80.14)
    --> 0x0a2b (5e55fefe2c80.19)

 Auto-Find currently on
 Auto-Use All currently off
 Reverse Lookup currently off
 Reverse SSL Lookup currently off
 VirtualHere Client not running as a service
We can observe the server name we set, the server ID along with port, and the devices we have. Most USB devices are readily named, but others on this list (such as a USB RGB mousepad and UPS data cable) are not so friendly name. You can play around to check what is what.
On your gaming rig either in Documents or C:/ possibly clean execution, you will create a Windows Batch script - I entitled mine virtualhere.bat aptly. You can now use this batch script to connect to the devices you wish. For example, mine is the following:
 @ECHO ON

 :: Connect Logitech Keyboard
 C:\Users\David\Documents\vh\vhui64.exe -t "USE,5e55fefe2c80.14"
 :: Connect Logitech Mouse
 C:\Users\David\Documents\vh\vhui64.exe -t "USE,6f35934291a3.12"
 :: Disconnect Logitech Mouse (to register properly)
 C:\Users\David\Documents\vh\vhui64.exe -t "STOP USING,6f35934291a3.12"
 :: Reconnect Logitech Mouse
 C:\Users\David\Documents\vh\vhui64.exe -t "USE,6f35934291a3.12"
 :: Connect UPS Cable
 C:\Users\David\Documents\vh\vhui64.exe -t "USE,d81108c67ca4.19"
 :: Connect Mousepad USB
 C:\Users\David\Documents\vh\vhui64.exe -t "USE,c42a769ce0a2.2322"
I connect my mouse first, disconnect, and reconnect due to an issue with Logitech G-Hub recognizing my settings. You may need to play around and see if any odd behaviors happen.
Now that we have VirtualHere client setup, we have our batch script, we need to launch it at start! But... It's not as easy as that. What you will find is that in server Trial mode, you cannot just start VirtualHere as a executable and go on trucking. You first have to click the OK trial server screen before the API and devices will be exposed. This poses a problem as, well, we won't have any keyboard to click on that and we really don't want to do that every single time.
AutoIt to the rescue. AutoIt proved to be the best solution since it can do user automation along with executable bindings. The script is very simple and rudimentary in nature and should work for all use cases.
 Run("C:\Users\David\Documents\vh\vhui64.exe")
 Sleep(1000)
 WinActivate("VirtualHere Client")
 Sleep(2000)
 ControlClick("VirtualHere Client", "", "[CLASS:Button; INSTANCE:1]")
 Sleep(500)
 Run("C:\Users\David\Documents\vh\virtualhere.bat")
What this will do is launch the VirtualHere client, sleep, activates the window (simulates click on it), sleeping move to provide grace time, clicks on the "OK" button the trial servers populate, sleeps half a second and then begin the Batch script we created to connect to our devices. Go to AutoIt and create a executable for the script (make sure to backup your script first!).
Awesome! We're almost finished! We have everything setup so we can click a script, it'll run VirtualHere, bypass the prompt, then start connecting to our devices. The last step is to make sure it starts at computer boot!
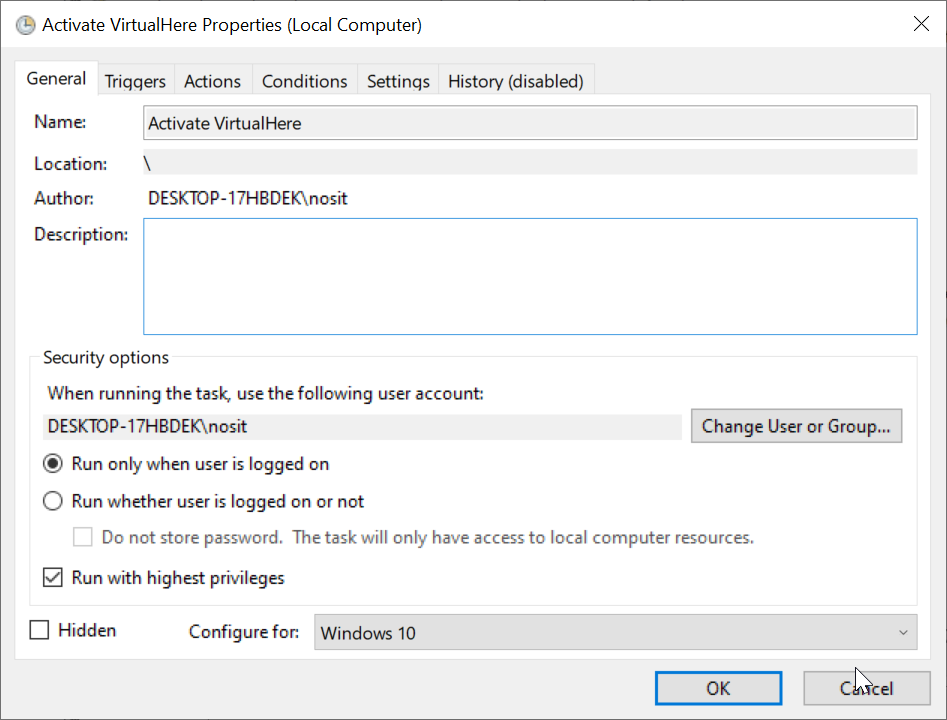
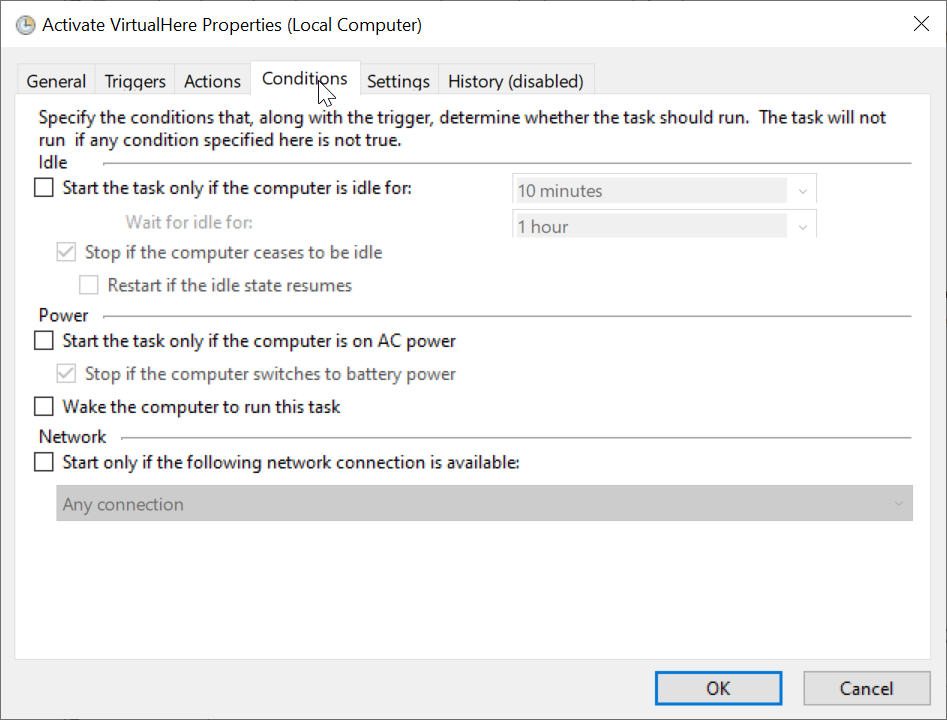
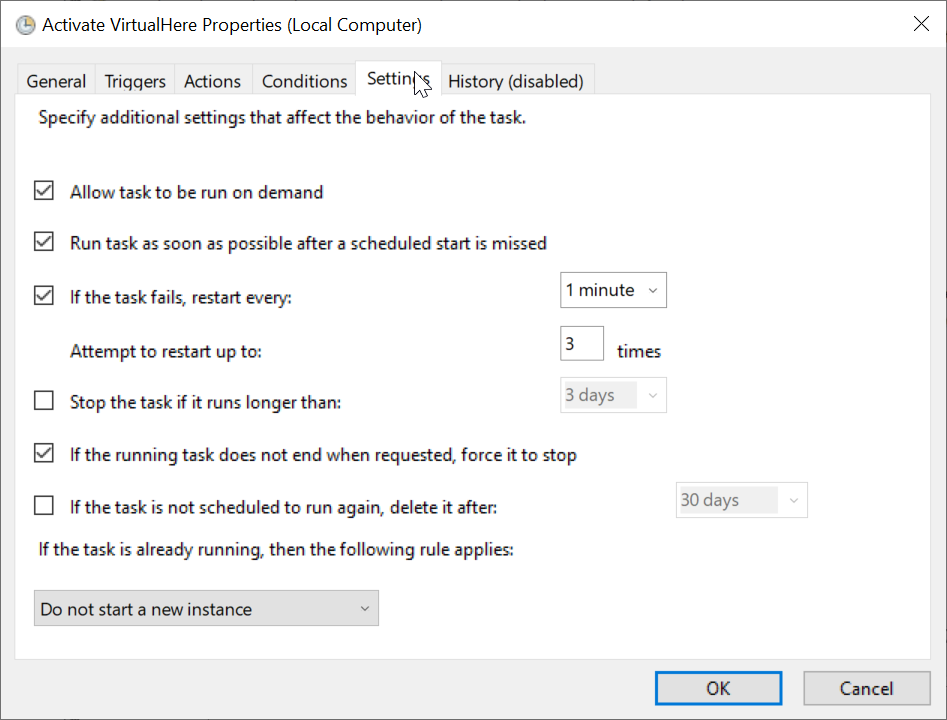
For computer boot, I ultimately landed at Task Scheduler. I ran into issues with nssm and making it a service. Task Scheduler was actually a better fit and more robust without needing outside dependencies (like NSSM).
Create a new Basic Task created "Activate Virtualhere" and set Run Only when User is logged in, set user to your Windows username and set "Run With Highest Privileges".
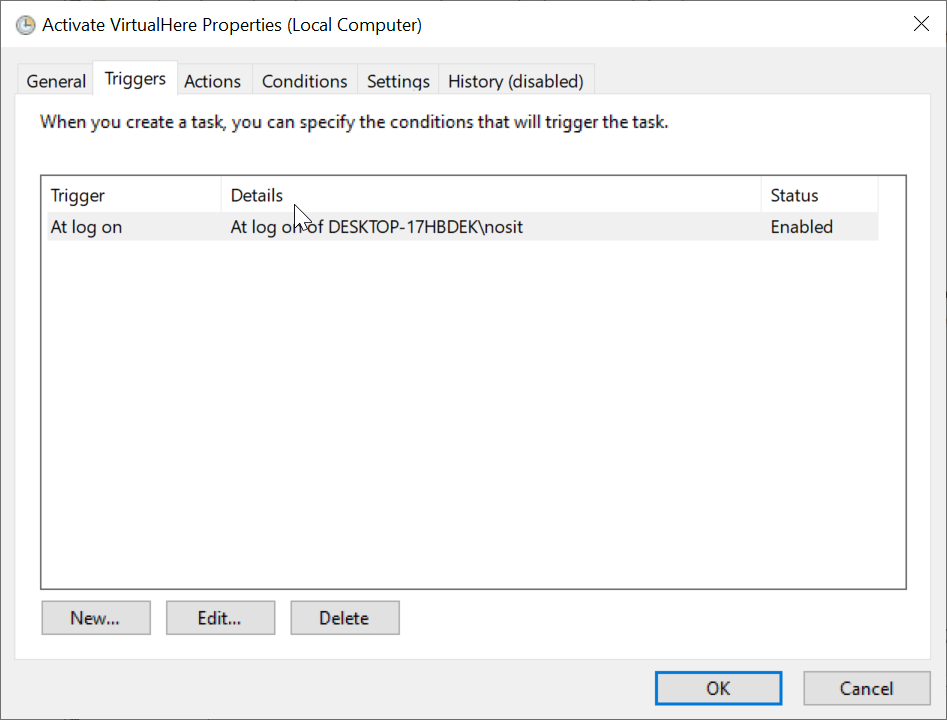
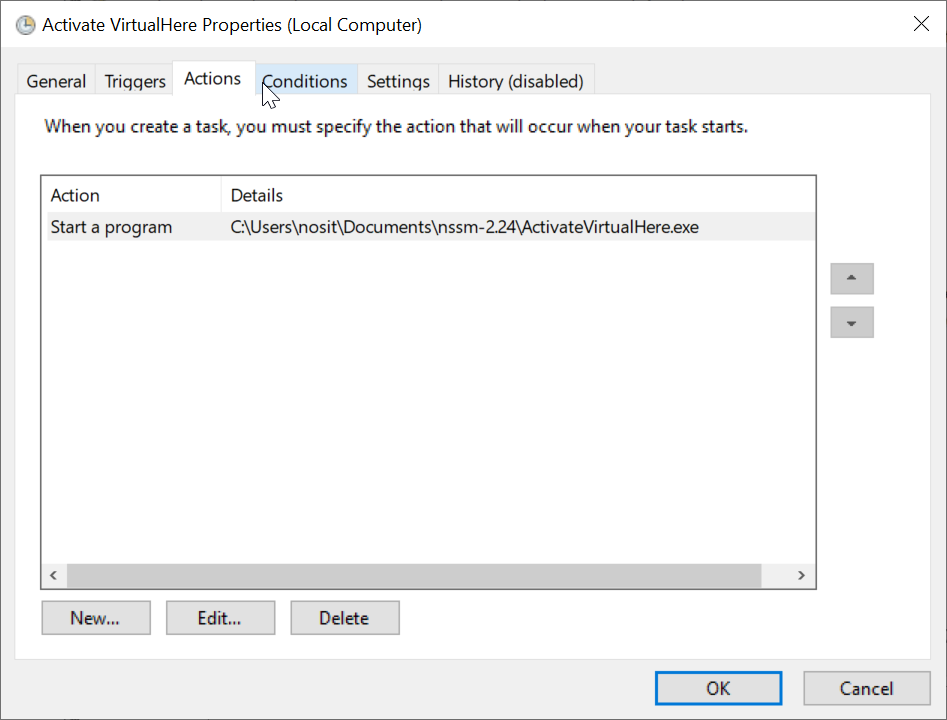
On Trigger, select new and add one for "At Log In" and "At Login of <Windows User>". Set actions to "Start a program" and select your AutoIt generated executable and you're off. The other settings can be left as default.
The last component I will add is something I just recently had to workaround after many solutions that did not work.
Fake Wake on LAN - Also known as "Why won't my machine parse WOL packets?
The last component to make this machine really powerful is remote power. Wake on Lan (or WoL) is perfect for this scenario is a great addition that can be encompassed into a workflow.
For those unfamiliar, WoL is a protocol that allows PCI and network interfaces to receive "magic packets" broadcast over ARP to enter from a extremely low power state (read: only the network adapter in a listen mode) to turn on remotely.
Unfortunately for me, by way of either Unifi or my network devices or even my Powerline, WoL does not work. At all. This left me with having to go into the closet to turn on the computer whenever I wanted to game. After many months of turmoil, I finally found the holy grail in the most simple of devices.

This little device does one thing, but gosh darn it if it doesn't do it well. It is simply put a dumb button presser. I attached it right on the edge of my case overhanging the button. When I'm ready to game, I just go to the Swtichbot App and select the switch and we are started! There are many settings such as a rocker type toggle (back and forth) or just simple press and retreat mode (with optional hold times). It was on sale, so I received it at about $21, but for a solution that works, I don't mind it.
We made it fam...
Congratulations - you now have a computer that is in a closet and no longer smoking your room out like you're a fine brisket. Images will be added soon, but wanted to get initial thoughts out. Hopefully this helps someone one day who might be in the same position I was!